Easy, family friendly Chicken Curry

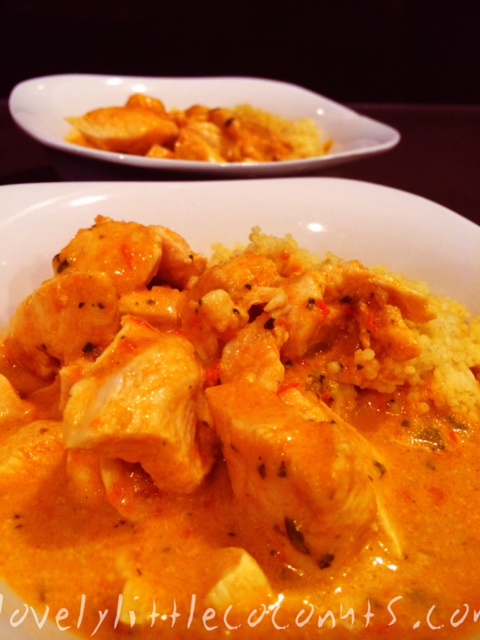
This is a very simple curry base that I have used for chicken or fish. Any delicate meat will work well. Even tofu would be a winner (if you swing that way!)


I generally don’t measure when I cook, and this curry is no different. Always taste as you go to alter or balance the flavours to suit your family’s taste.


Gluten free, dairy free (if you don’t use butter), nut free and very tasty!


Chicken curry 2

Ingredients:

1 onion

1-2 cloves of garlic

Fresh ginger (approx 2cm piece,peeled)

Large handful of fresh herbs (I use curry leaf, thai basil, garlic chives, 2 bay leaves)

1-2 T curry powder of choice (I wouldn’t recommend ‘Keens’ as I find the flavour a little harsh, but if you like it, use it!)

3 large, ripe tomatoes

1 T fish sauce (or to taste)

1 tsp sesame oil (or to taste)

1-2 T white balsamic vinegar (or acid of choice – lime juice is nice)

1T rapadura / coconut palm sugar / raw sugar

Salt and pepper

500g chicken (thighs work best because they retain their moisture, but I used breast last night and it worked just fine), sliced

3/4 cup thick coconut cream

Cooked millet to serve


Method:

1. Finely chop onion and garlic and fry in oil (or ghee or butter) until soft. Add grated ginger and allow to soften a little.

2. Stir through finely chopped herbs and curry powder. Fry off until fragrant.

3. Finely chop tomatoes and stir through. Allow to simmer for a few minutes.

(Steps 1-3 can be easily covered in TMix – after chopping and sauteeing onion mixture, add herbs and turbo for a few seconds, scrape down and add tomatoes. Turbo for a few seconds until smooth. You could continue cooking the curry in TM, but I like to pour into my pan and continue cooking in there so I can cook my millet to serve with the curry in the Thermie)

4. Add the fish sauce, sesame oil, vinegar, sugar,salt and pepper. Stir through and continue to lightly simmer until the sauce has reduced by around 1/4 of it’s volume. Taste and adjust seasonings if required.

5. Add chicken and allow to continue to simmer for around 15-20 minutes. While the meat is cooking through, cook your millet in the Thermie (or on the stovetop) in salted water or stock. (Using the Thermie bowl is fantastic here if you used it to chop your herbs, onion etc as the flavour goes through the water and the millet)

Chicken curry

6. When the chicken is just cooked through, add coconut cream and stir through. Allow the sauce to warm through again before serving.

7. Serve with millet and steamed greens (if you have them).


Enjoy!

Crunchy Noodle Frittata

Using up leftovers is one of my favourite things to do. Not only is it budget friendly, it gives me such a sense of satisfaction to make something delicious from next to nothing.


This little gem was created today, using leftover adzuki bean noodles, eggs and a few fresh salad ingredients. Sub the butter for alternative fat of choice and leave out the cheese to make it dairy free.


Noodle frittata


Gluten free, cheap as chips, packed with nutrition and protein and so simple.


Ingredients:

3/4 cup of leftover noodles (firmer noodles work best)

2 eggs

Cheese

Butter

Fresh salad of choice (I used tomato, cucumber, avocado and baby spinach with fresh lime juice. Bean shoots would be a great addition – whatever you love to eat really)

Salt and pepper


Method:

Melt butter in small frypan on low to medium heat.

When it just starts to bubble, pop your cold leftover noodles in the pan and allow to cook until it begins to crisp slightly on the bottom.

Whisk eggs, add salt and pepper and pour into pan. Allow to cook approx 3/4 of the way through. Flip.

Allow to brown on other side while you add the cheese to the top.

When cooked, remove from pan and top with salad of choice.


Prepare to feel satisfied for the rest of the afternoon 🙂


Beginners Cheesecake

Cheesecake

So.

If you don’t eat dairy, look away now!

I have been searching high and low for a looooong time for a dairy-free, cashew-free cheesecake with no success. I did find a few ideas based on silken tofu, but I limit the amount of soy in my diet as well as dairy, so that wasn’t going to work either.

I finally decided I was being WAY too precious. I don’t need to eliminate dairy. Just reduce my intake.

So I took the plunge and grabbed the cream cheese and threw caution to the wind.

Basic, rich and satisfying, this cheesecake ticks all the boxes. As well as gluten-free with no nasties, organic berries and sweetened with unrefined sweetener. What’s not to love?

Cheesecake

Base:

2 cups activated almonds (or regular, raw almonds will work fine), ground as fine as you desire.

3 tbsp melted butter

3 tbsp rapadura or coconut sugar (or dry sweetener of choice)

Mix all ingredients together well.

Press firmly into base of springform tin lined with baking paper. Refrigerate until firm.

Filling:

750g cream cheese (NOT low fat or spreadable) – room temperature

1/4 to 1/2 cup rapadura, coconut sugar or dry sweetener of choice, to taste

vanilla (I use my home made vanilla which is split vanilla beans steeped in vodka)

250g sour cream (again NOT low fat)

Whip cream cheese, sweetener and vanilla until light and fluffy (this took about 4 minutes on Sp 4 in thermomix, butterfly in). Gently mix in sour cream, a spoon at a time, until incorporated. Mixture will ‘fall’ a little when you do this, but that’s ok.

Pour / scoop / spoon mixture over almond base. Smooth the top, refrigerate for several hours – overnight is even better – and proceed to lick the bowl before the children find you!

Topping:

1-2 cups frozen, mixed berries (organic)

Vanilla

1/4 cup maple syrup (or to taste)

Gently heat the vanilla and maple in small saucepan. Add berries and allow to soften for a few minutes. Remove berries and allow the liquid to reduce slightly. Place berries and liquid back into the fridge together to chill.

To serve:

Warm a knife under hot tap water and run gently around the outside of the tin to loosen the edges. Gently remove the outer section of the tin. Spoon berries and sauce over the top of the cheesecake just prior to serving.

Cheesecake

** Note: This is a very rich cheesecake, however it is not overly sweet. Feel free to add extra sweetener, taste as you go.

Enjoy!! 🙂

Gluten-Free Chocolate Chunk Cookies

Choc chip cookies 2

AnnieB asks me every weekend for cookies. And every weekend I dodge the subject and convince her she REALLY wants cake. Or muffins. Or banana bread. I do not know why I avoid cookies like I do? Maybe my aversion to sticky messes? Gunky hands and lots of washing up?

Yesterday I weakened and started Googling. I stumbled across this recipe from The Gluten Free Goddess and could see the  ‘tweaking’ potential immediately. THEN I realised I could ‘amp’ up the nutritional value with some Berry Choc Chunk and I was committed. Cookie demons, beGONE!!

I used the Thermomix, but you could easily use traditional methods. I found thermie was perfect as I could grind my buckwheat flour and chop up my chocolate in the process.

Choc chip cookies 1


Ingredients:

1 cup buckwheat (ground into flour)
1 cup sorghum flour
1/2 cup tapioca starch
1 1/2 teaspoons xanthan gum
1 1/2 teaspoons baking powder
1/2 teaspoon bicarb soda
1 teaspoon sea salt
1 cup coconut oil or butter (I used a combination, approx 2/3 butter, 1/3 coconut oil)
1 cup rapadura or coconut sugar
1 tablespoon vanilla
1 tablespoon honey or rice malt syrup
2 eggs
3 tbsp milk of choice (I used dairy – you could use coconut, rice, almond)
150g roughly chopped dark choc of choice (I buy the best I can afford, avoiding soy and refined sugars where possible)
Method:
1. Mix all dry ingredients together well (except dark chocolate.)
2. Combine wet ingredients (except for milk)
3. Add wet ingredients to dry, mixing well. The mixture should be wet enough to ‘drop’ onto cookie sheet. If you need it, add the milk and mix through.
4. Gently stir the chocolate chunks through.
5. Drop generous spoonfuls onto cookie sheet and bake in a moderate oven (approx 160 deg, fan forced) for approx 10 minutes.
6. Remove and cool on wire racks. Store in airtight containers.
The cookies are best eaten within 2-3 days (weeeeelllll….. actually they are BEST eaten on the day of baking while still warm with a side of vanilla ice cream, but I understand some people will want these in lunchboxes…..) as they become a little dry and crumbly after a few days.
If they do dry out, crumble them up and sprinkle over fruit, ice cream or add to fruit crumble toppings. Yummy!
Enjoy!! 😀